

Dug into the side of the Boloi ridge is Smudgerock Mine 4. Abandoned for centuries when the Smudgerock clan moved out, it sits as an intact ruin just north of the Jyperia plains that Boloi ridge boundaries. An ancestor of the original owners, Thew Smudgerock, would like to reclaim the mine but they need to know if it’s safe. The characters have been hired to explore the mine and hold, clear them of any dangers and report back. In particular Thew wants the party to get rid of the ghost of Derex, the coward king who haunts the mine.
This is a problem solving adventure. The Ghost of the Coward King is quite the annoyance and will require a clever and/or innovative solution to get rid of. Annoyingly, Derex is immune to the traditional methods of dealing with a ghost. The mine and hold is mostly an empty template for GMs to add content suitable to their setting and system.
As soon as the party enters the mine, they are accosted by the ghost. The ethereal apparition is only partial and fades off below the waist and appears to be haggard and sleepless with a broken crown on his head and a dirty shirt. Derex complains constantly about how they were treated in life and death, about the quality of their tomb, about the weather, about the mine, about the characters behaviour and appearance and about long ago slights and grudges. When not complaining the ghost tries to convince the characters that running away from the battle was the right thing to do, that the battle wasn’t that important and wasn’t his fault, that it was Kiltbiter’s fault, that reinforcements didn’t arrive or that Throgbeard’s scouts led them into an ambush and various other excuses. If the party ignores Derex, his complaints become more petulant and whiney. He is unable to physically interact with anything and cannot cast spells or use scrolls; in short he’s quite useless. His unfinished business appears to be his justly deserved reputation. He will resist attempts to remove him in the only way he can – by being increasingly annoying.
Smudgerock Mine 4
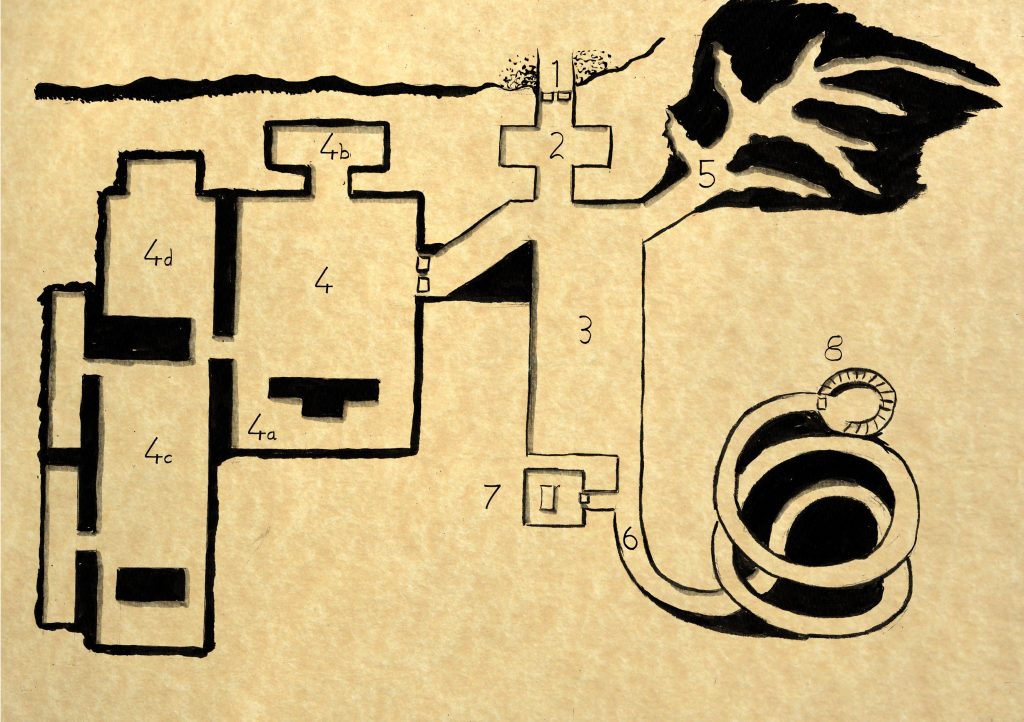
The stone work is of good quality and has withstood the tests of time. The damp course is intact and the ventilation has kept the air moving and fresh. All the hallways and corridors are three minecarts wide.
(1) The Front Doors are stone and unadorned apart from a basic address rune and ownership seal of deed and claimant. A suitable magic stone of identification is required to unlock and open them.
(2) The Guard House is a square room with two inset bunkers on the interior wall facing towards the outside door. Two large stone tables run along either side where the goods and details of visitors were once checked.
(3) The Goods and Cargo Area has a set of iron tracks in the floor for mine carts. There are many marks on the floor indicating that much equipment was once mounted here. The tracks lead down into the mine. There’s one mine cart with a broken wheel.
(4) The Hold is built around a great hall which has a great stone table in its centre large enough to seat 100. The entrance doors are tall, narrow and made of thick wood. Light wells have been cut into the roof to let in the midday sun. Off the hall is the kitchen (4a), the store rooms (4b), and the quarters (4c). There is an empty room (4d) whose purpose was lost when the furnishings were taken. All the rooms are bare and lack even broken debris. Even the small doors that separate the rooms in the quarters have been taken. The store contains a well and a partially full rain trap. One of the light wells has weathered enough that it’s open enough for a large beast to enter and exit. There are signs around the hold that something might be using the rooms as shelter.
(5) The Mine tunnels are cut in a professional search pattern until they encounter an iron ore vein, then the tunnels follow the ore. There’s plenty of medium quality ore to be extracted. A single large iron bar gate is securely fastened to prevent exit from the mines.
(6) A Spiralling Slope leads off from the goods and cargo area and climbs and climbs.
(7) The Tomb’s entrance is just along the spiral slope. It’s a small stone door that’s unlocked leading to a small corridor. It opens up to a large pair of dark stone doors 3 metres high and 3 metres wide. The carving is professional but utterly unadorned. There’s a simple plain dwarven rune that says “ Derex: Coward King: Lies Within”. The doors will open when pushed and stay when held by a person but if let go they close inevitably. If blocked either the blockage breaks or the door does. There is no purchase on doors and they push inwards into the tomb. A sarcophagus rests on the floor. It has no markings and is flat and sharp cornered. The dwarf within is dressed in only a plain grey robe. There are no weapons, armour or treasures. In the dwarf’s hands is a stone tablet that says “Here is Derex. They fled the battlefield and left our warriors to die. They lie here now forever in dishonour”.
(8) A Watch Tower sits atop the Boloi Ridge that has been carved from a rock spire. The spiral slope ends at a locked door that requires the stone of identification from the front door. It’s 3 stories tall and there’s no interior floors, only a staircase leading up to an enclosed roof. From here you can see almost to the limits of the Jyperia plains to the south and much of the badlands to the north. Getting up here without taking the spiral slope would require professional climbing gear and expertise and would take at least a day.
- Another Sarcophagus by ccarlstead – CC-BY-NC-ND-2.0
- Smudgerock Mine 4 Map by Chris Tregenze – CC-BY-SA-NC-4.0